
Making blog

I have created a Storyboard with a rough outline of the animation. This is what I will show Henry to get the feedback from him and his amazing creative mind to match his vision as closely as possible.
The script for this early iteration is the following:
Title: The Adventures of the Running Turbine Scene 1: In the Countryside • Camera pans over a green landscape with gently swaying trees. • A cheerful little wind turbine energetically collects energy, its blades spinning quickly in the wind. • Voiceover: “In a world where energy is as valuable as gold, there is a small turbine that wants more.”
Scene 2: The Wind Dies Down • The leaves stop blowing, the turbine looks worried. • Voiceover: “But what happens when the wind dies down?” • The turbine looks into the distance, determined.
Scene 3: The Run Begins • With a cheerful beep, the turbine starts moving, running through fields and over hills. • Animals look on in wonder as she passes by. • Voiceover: “Our little turbine won’t be beaten. She’s looking for stronger winds, wherever they may be.”
Scene 4: Into the Sea • The turbine reaches the coast and doesn’t hesitate for a moment. • She jumps into the water and starts swimming. • Voiceover: “The sea calls, and our turbine answers. On to new shores!”
Scene 5: Arrival at the Wind Farm • The turbine reaches the wind farm, where other turbines greet her. • She takes her place and starts collecting energy again. • Voiceover: “Among friends and with steady wind, life is good.”
Scene 6: The Next Adventure • The turbine looks into the distance, where dark clouds announce a storm. • She says goodbye to her new friends and swims bravely towards the horizon. • Voiceover: “But the adventure never ends when you have a heart full of courage and wings full of dreams.”
End: • The camera pulls back and shows the turbine swimming into the distance, ready for her next big adventure.
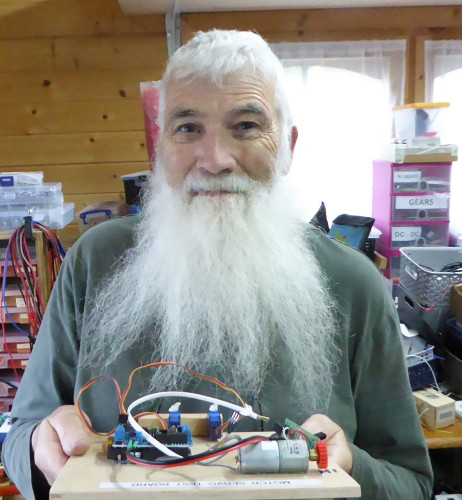
I have made all the building blocks to realise Cole’s idea of generating electricity from a Trampoline.
I am using the same idea as the kinetic tile using a string (orange) attached to the centre of the bounce platform. A pulley and gears turns an electrical generator. As the voltage will vary from 0 to 10v I am using two DC to DC convertors to stabilise this at 4.2v so as to be able to charge the batteries. The generator unit will be mounted underneath the trampoline. A magnetic switch will count the number of jumps.
The system will use two battery packs each using two 18650 li-ion batteries. While one pack is being charged the other will power the display. Each battery (4.0v) needs to be charged separately while the display will run on two batteries in series (8v). The batteries and display will be housed in the custom wooden box which will be mounted on the handle of the trampoline.
I was happy with the completed model and congratulations to James for a brilliant idea!
James's idea was ingenious! As soon as I saw it I wanted to make a model of it. How clever to think about the wings of the Angel of the North and that they could be used to generate energy from the wind.
I decided to build a model to show the wings moving, the real thing would be powered by wind but for the exhibition inside I decided to use a tiny motor to turn the wings. The first thing I needed to do was find a model of the Angel of the North that I could customise. I found a flat pack model that took a few hours to make gluing all the tiny parts together. I then cut off the wings so that I could attach them to a motor. I attached the motor to the back of the Angel and worked out how to attach that to the wings.
I found some rust coloured paint and some modelling grass for the ground.

We have been looking at how Jack's shelter could plug in to a structure. These shelters would be able to provide a living / sleeping space for one person and could be joined to facilitate a family.
We have also begun to work on the final 3D model!
We have started to look at how the shelter could be made mobile and also be as flexible as possible. One of our ideas is to create a permanent structure which could house the solar panels and rainwater collector, pods could plug in to it to access power and water. This could allow more than one shelter to be facilitated at one time.
We invited Jack to the office to talk through his idea and how we might bring it to life. Jack had some fantastic ideas, one of which was to make the shelter mobile so it could be moved to where it is needed most.
Now for the fun part - designing and building the beach / motorway scene! I have used a mixture of natural materials that I collected from the beach near where I live including sand, tiny sticks, rocks and little stones and combined these with paint and some glue to build up texture on the base board.
I painted the sea by mixing sand with acrylic paint and tried mixing different tones to create depth and waves. This part of making the model has been my favourite so far as I can start to see it all coming to life.
Alongside working on the robotic part of the model I have started to making the baby turtles using air dried clay and painting on their markings. They are looking very cute!
The first prototype of the conveyor belt is up and running! It's powered by a motor which turns the conveyors belts in opposing directions so that the turtles can travel in both directions up and down the beach. It also runs the windmill to show that element of the design in action.
For the animation I use a stills camera and move the character a little bit, taking a photo every time. This creates the illusion of movement. It takes quite a long time to do but it’s great when you start seeing the character come to life.
When I met with Bo we talked about where to set the scene of the animation. We decided a bus stop would be good as people get quite cold when waiting for their bus to arrive. I’ve made a little road and bus stop sign to put the character on. The background is green so that I can change it later on the computer.
So that the character can look cold before her auto shiver bracelet detects she’s cold, I thought her teeth could chatter so I’ve made lots of different mouth shapes so this can happen. It will also be useful to give the character expression.
The shoes are made from a similar kind of clay to the one I used to add to the wire structure. This one is called magic sculp and allows you to make things that have more detail like these little trainers.
Now it’s time for the most important part - Bo’s bracelet. Bo described this on the drawing as shiny metal so I’ve saved a shiny sweet wrapper foil to cover the card underneath so it looks like how it has been described.
I’ve threaded the hair through all the holes in the head and now need to trim down the wool a little so it’s more like the length that Bo drew it in her picture.
The clothes have been made by adapting a full-size pattern into a tiny one, I’ve chosen fabric colours to look like Bo’s drawing.
I’ve drilled lots of holes in the head so that I can thread through wool to give the character hair. The eyes are wooden balls I’ve painted and varnished to look like pupils. They’ll be able to move around to give the character life.
This is what the face is like when it comes off the plastercine model. I need to join the back and front pieces back together with more papier-mâché as you have to cut it in half to get it off the original sculpt.
Now the armature is dry I’ve added upholstery sponge which is the padding that comes out of sofas. It’s easy to cut it to shape with a pair of scissors but it gets a bit fiddly where the fingers are as they are quite small!